【Agents 开发】如何为 Agent 增加 Memory 能力

详细阅读:https://www.letta.com/research
内容笔记:来自 deeplearning.ai 「LLMs as Operating Systems: Agent Memory」

在和 LLM 模型交互过程中,输入的 Prompt(也叫做 Input Context)能够很大程序上影响模型的推理和输出结果,基于 Prompt + LLM 调用默认是没有持久化 Memory 能力,用户需要显式去管理必要的上下文存储。在 Agent 应用过程中,可能需要做记忆的内容包括:

  • 和用户的聊天历史
  • 用户身份相关的信息
  • 任务历史
  • Multi-Agent 系统共享信息

LLM 的 Input Context Window 是有限的,更长的 Context Window 推理消耗的资源和延时都会更大,如何管理 in-context 信息哪些要被包含进 context Window,哪些不包含,在需要去关注的问题。

MemGPT: Towards LLMs as Operating Systems》这片论文提出了如何管理 Agent Memory 的方法,这里把 Memory Sources vs. Context Memory(实际 LLM 推理中用到的 Context),类比在 操作系统里面的 Virtual Memory vs. Physical Memory。

Agents 内存读写

基于 LLM 多轮推理的 Agents,需要在推理过程中维护一个 State 数据。多轮推理的过程称为 Agentic Loop,单次的推理(对应一次 LLM call)称为 agent step,在一个 agent step 中:

  • 从 Agent State 中加载上下文,拼接到 LLM Context Window,这个过程称为 Context compilation
  • 基于输入的 Context Window 做 LLM 推理
  • LLM 输出更新 Agent State

这里先来实现一个最简单的 Agent 内存读写。

  • 初始化 LLM API Client
1
2
from openai import OpenAI
client = OpenAI(api_key=OPENAI_API_KEY, base_url=OPENAI_API_URL)
  • 实现一个 KV Memory 结构,并提供 Function-Call Tool
1
2
3
4
5
6
7
8
9
10
11
12
13
14
15
16
17
18
19
20
21
22
23
24
25
26
27
28
29
30
31
agent_memory = {"human": "", "agent": ""}
def core_memory_save(section: str, memory: str):
agent_memory[section] += "\n"
agent_memory[section] += memory.strip()
print("current memory: ", agent_memory)
core_memory_save_desc = """Save important information about you, the agent or the human you are chatting with."""
core_memory_save_propertis = {
"section": {
"type": "string",
"enum": ["human", "agent"],
"description": "Must be either 'human'(to save information about the human) \
or 'agent'(to save information about yourself)."
},
"memory": {
"type": "string",
"description": "memory to save in the section."
}
}
# 这里提供了一个 core_memory_save 的 tool
core_memory_save_metadata = {
"type": "function",
"function": {
"name": "core_memory_save",
"description": core_memory_save_desc,
"parameters": {
"type": "object",
"properties": core_memory_save_propertis,
"required": ["section", "memory"]
}
}
}
  • Prompt 设定,提供 Memory Context 管理的能力
1
2
3
4
5
6
7
8
9
10
system_prompt = """you are a chatbot.
You have a section of your context called [MEMORY]
that contains information relevant to your conversation
you can use this information to answer questions.
"""
messages=[
{"role": "system", "content": system_prompt},
{"role": "system", "content": "[MEMORY]\n" + json.dumps(agent_memory)},
{"role": "user", "content": "My name is QuantumForge"},
]
  • 调用 LLM 推理接口
1
2
3
4
5
6
7
8
chat_completion = client.chat.completions.create(
model=OPENAI_MODEL_NAME,
messages=messages,
tools=[core_memory_save_metadata],
tool_choice="auto",
)
response = chat_completion.choices[0]
print(response)
  • 调用输出,memory 的 KV 更新成功
1
2
3
Choice(finish_reason='tool_calls', index=0, logprobs=None, message=ChatCompletionMessage(content='\n\n', refusal=None, role='assistant', annotations=None, audio=None, function_call=None, tool_calls=[ChatCompletionMessageToolCall(id='call_ortft9h7z3gh7l9r6kzt67w6', function=Function(arguments='{"section": "human", "memory": "QuantumForge"}', name='core_memory_save'), type='function')], reasoning_content='Okay, the user mentioned their name is QuantumForge. I need to save that into the core memory under the human section. Let me call the core_memory_save function. The parameters should be section "human" and memory "QuantumForge". Make sure the JSON is correctly formatted.\n'))
{'section': 'human', 'memory': 'QuantumForge'}
current memory: {'human': 'QuantumForge'}

深入 MemGPT

对于复杂 Agent 应用的 Prompt,可能会包含不同类型的上下文,如何拼接和生成对于的 Input Context 对 LLM 输出效果影响很大。

MemGPT 是在这个场景下,提供一套自动更新和管理 Agent Memory 的机制,下图的 LLM OS 扮演着类似操作系统里面的内存管理角色。

对于 MemGPT 来说,能够自主执行动作,并能够基于 Long-term Memory 来自我学习,关键点包括几个:

  • Self-editing Memory:提供一个 Tool 能力,让 LLM 能读写状态内存,一些 System 设定或者 Instruction 信息可以存储到 MemGPT,Agent 可以通过会话过程中学到的新增信息来更新 Mem
  • Inner-Thoughts:MemGPT Agent 会在回答用户问题之前,会有一个思考的过程
  • Call-Tools:MemGPT 的输出都是 Call-Tools,比如和用户的沟通会去调用 send_message tool
  • Looping via heartbeats:用户的一次 Input 会触发多轮 LLM 推理,MemGPT 在调用 Tool 时会设定一个心跳去触发下一个 Tool 调用

MemGPT Agent 会把 Memories、Tools、Messages 进行持久化存储到 Agent State,在 Query LLM 之前把 State 中的信息做 Context Compilation,筛选出必要的 Context 增加到 Prompt 中。

MemGPT 的 State 存储会分为两层结构:

  • Tier1 - In Context

    • core memory 存储,会储存重要且频繁访问的 Context,会有大小限制
    • summary 信息,对于历史 messages 的 summary,避免过长的 in context window
  • Tier2 - Out of Context:recall/archival memory 会提供 stats 统计信息,帮助 agent 快速判断是否有关联信息

    • recall memory:所有的 messages 历史,支持 agent 快速检索历史 messages
    • archival memory:在 core memory 达到 Limit 限制时会写入 archival memory,同时 archival memory 也可以作为 RAG 数据源

MemGPT 实践

可以基于 Letta 来实现一个 MemGPT Agents。Agents 的能力主要通过:Prompts( system 或 users)、Tools、Memory 能力、Memory 内容(core & archival)来实现,这四个部分会在每一个 agent step 中拼接出 LLM Context 作为模型的输入。

详细实践可参考 Letta 用户文档

内容总结自 Deeplearning.AI 的 Evaluating AI Agents 课程

在 AI Agents 的搭建过程中,我们需要搭建 Agent Pipeline,并观测整个 workflow 中的关键环节,评估每个环节的效果和优化方案,比如对于一个 AI Coding Agent,需要建设的模块包括:

  • Workflow 流程:更新 Agent 的整体逻辑
  • Plan 阶段:更新和优化 Prompt
  • Use Tools 阶段:增加不同的工具和输入
  • Reflect 阶段:调整 LLM 模型

以下会通过来构建一个 Code Agent,并介绍如何做 Agent 效果的评估和迭代。

LLMs 效果评估

提到 LLM 评估,一般包括 model 评估和应用评估:

  • LLM model 评估:用 Benchmark datasets 评估基础模型的能力,常见的 datasets 包括:

    • MMLU,覆盖数学、心理学、医学等的多选问题
    • HumanEval,代码生成场景
  • LLM 应用评估:用测试集来验证整个 LLM 应用的效果,测试集来自人工编写、合成 case、实际业务数据

    • 多个环节会影响 LLM 应用的效果,包括 Prompt、Tools、Memory、Routing 等

这里我们主要关注 LLM 应用评估。LLM 应用测试与传统应用测试有所不同:

  • 传统应用测试面对的 case 在给定输入情况下,输出是相对确定性的,通过单元测试验证函数和代码片段的效果,通过集成测试验证整体应用表现;
  • LLM 应用在给定输入情况下,输出会有一定的随机性,关注应用解决用户特定输入任务的能力,输出效果往往会关注相关性和连贯性,而非传统应用测试的 pass/failed

LLM 应用评估的类型包括:

  • 幻觉(Hallucinations):LLM 是否能够准确理解上下文,并完成对应的工作
  • 检索相关性(Retrieval Relevance):上下文和知识理解是否和用户 query 相关
  • 回答准确性(Q&A Accuracy):回答是否匹配用户的需求
  • 内容合规(Toxicity):回答是否包含有害和不合规的内容
  • 性能表现(Summarization performance):应用的性能情况,可以通过开源评测 datasets 来验证
  • 正确性&可读性(Correctness & Readability):主要用于代码生成场景

Agents 评估的作用

Agents 是基于用户输入,结合 LLM 的推理能力来完成特定的工作任务:

  • 推理能力:LLM 模型
  • 路由能力:理解用户的意图,决定使用合适的工具
  • 动作执行:执行代码和工具,主要是基于 API 调用

Agents 在执行过程中可能会出问题的地方有哪些? 以一个规划旅行计划的 Agent 为例:

  • 输入 query:预定一个去旧金山的计划

  • Agent 执行流程中可能出问题的地方:

    • 路由能力:选择了错误的工具
    • Function-call:比如调用 search API,调用参数错误
    • 上下文:RAG 上下文错误
    • 生成回答:回答不清晰或者包含不合规的内容
    • 正确性:没有解决问题,用户不满意

AI 应用工程开发上,往往微调 Prompt 或者模型设置,带来的效果变化就非常显著。

下面会具体介绍集中在开发和生产环境中,用于提升 LLM 应用效果的工具和方法。这里我们引入开源的 Agent 观测工具 Arize Phoenix

Tracing Agents

通过 Trace 来观测整个 Agent 的执行过程,Trace 会记录每一个执行步骤,并通过 Span 来呈现步骤中的关键数据,Trace 遵循 OpenTelemetry 规范。先安装 Arize Phoenix 依赖:

1
2
3
4
pip install arize-phoenix arize-phoenix-otel

pip install openinference-semantic-conventions opentelemetry-api opentelemetry-sdk
pip install openinference-instrumentation-openai

本地用 docker 启动 Phoenix Server:

1
docker run -d -p 6006:6006 -p 4317:4317 -i -t arizephoenix/phoenix:latest

Trace Collector 的 Endpoint 为 COLLECTOR_ENDPOINT=``http://127.0.0.1:6006/v1/traces

增加 main span 代码,调用 run_agent Agent 主逻辑:

1
2
3
4
5
6
7
8
9
10
11
12
def start_main_span(messages):
print("Starting main span with messages:", messages)

with tracer.start_as_current_span(
"AgentRun", openinference_span_kind="agent"
) as span:
span.set_input(value=messages)
ret = run_agent(messages)
print("Main span completed with return value:", ret)
span.set_output(value=ret)
span.set_status(StatusCode.OK)
return ret

Agent 主逻辑内容也增加 Tracer decorator,Tools 函数定义增加 @tracer.tool() Decorator 修饰。

1
2
3
4
5
6
7
8
9
10
11
12
13
14
15
# ...
while True:
# Router Span
print("Starting router call span")
<strong> with tracer.start_as_current_span(</strong>
<strong> "router_call", openinference_span_kind="chain",</strong>
<strong> ) as span:</strong>
<strong> span.set_input(value=messages)</strong>

response = client.chat.completions.create(
model=MODEL,
messages=messages,
tools=tools,
)
# ...

执行 Agent 代码,在 http://127.0.0.1:6006 上拿到 Trace 记录。

Router 和 Tools 评估

评估的手段主要分为三种:Code-Based Evals、LLM-as-a-Judge Evals、Human Annotations

Code-Based Evals

基于代码评估 Agent 的输出,类似传统的单测,执行一些验证代码,手段包括:

  • 对输出结果进行正则匹配、Json 解析、关键词检查等
  • 输出结果和 Expected outputs 进行比较,包括直接匹配、Cosine 相似度/距离等,这里需要有 ground-truth 的 Expected outputs

LLM-as-a-Judge Evals

用单独的 LLM 来判断 Agent 的输出质量,把 Agent 的输入和输出拼接形成新的 Prompt,并把对输出结果的评价标准加入到 Prompt,用 LLM 输出来判断 Agent 的效果。

例如我们用 LLM 来评估一个 RAG retrieval span 的效果,注意 Eval Template 部分的 Prompt 内容。

LLM-as-a-Judge 需要注意的关键点:

  • 需要用 SOTA 的模型去做评估,比如 GPT-4o 和 Claude 3.5 Sonnet 等
  • LLM-as-a-Judge 做不到 100% 正确性,这里错误评估可以通过迭代 Prompt 和模型来降低影响
  • LLM-as-a-Judge 输出应当去给出离散的分类标签,应该是 正确 vs. 错误,而不是一个 1-100 的估分

Human Annotations

人工打标和用户反馈,可以通过一个人审队列来给出 Agent 的结果评估,或者是来自实际用户的反馈。

不同工具的区别可以从结果是否确定性,以及定量/定性两个维度来区分。


非确定性评估
确定性评估
定性分析,相对灵活
LLM-as-a-Judge
Human Annotations
定量分析,模式固定

Code-Based Evals

人工评估给出确定性结果是最优的手段,实际规模化会受限于人力投入和成本,往往需要用 Code-Based Evals 和 LLM-as-a-Judge 来辅助快速迭代。

Router 评估

Router 的评估主要关注两个点:

  • Function-Calling 选择:Router 是否选择了正确的 Function
  • 入参提取:Router 是否从用户输入中提取出正确的 Function 参数

以下是使用 LLM-as-a-Judge 来评估 Router 的 Prompt 模板,Prompt 包含几个部分:评估背景、上下文信息(问题、选中的 Tool)、评估标准、tools 定义等。

Tools 评估

Tools 评估可以通过 LLM(相关性、幻觉、可读性、正确性等)或者 Code-Based Evals(正则匹配、Json 解析等)。对于之前 Code Agent 的 Tools 评估:

  • Tool#1 数据库查询:SQL 正确性验证,可以用 LLM 或者 Code-Based Evals
  • Tool#2 数据分析:主要依赖 LLM 来做可读性和正确性的验证
  • Tool#3 代码生成:Code-Based Evals,验证代码是否可以运行

这里以 Router 的评估为例,评估逻辑代码:

1
2
3
4
5
6
7
8
9
10
11
12
13
14
15
16
17
18
19
20
21
22
23
24
25
26
27
28
29
30
31
# 从 Phoenix 中加载 Tools Router 的 Spans
query = SpanQuery().where(
"span_kind == 'LLM'",
).select(
question="input.value",
tool_call="llm.tools"
)
tool_calls_df = px.Client().query_spans(query,
project_name=PROJECT_NAME,
timeout=None)
tool_calls_df = tool_calls_df.dropna(subset=["tool_call"])

# 使用模型来判断 Tools 选择的正确性
with suppress_tracing():
tool_call_eval = llm_classify(
dataframe = tool_calls_df,
template = TOOL_CALLING_PROMPT_TEMPLATE.template[0].template.replace(
"{tool_definitions}", json.dumps(tools).replace("{", '"').replace("}", '"')
),
rails = ['correct', 'incorrect'],
model=OpenAIModel(model="gpt-4o"),
provide_explanation=True
)

tool_call_eval['score'] = tool_call_eval.apply(
lambda x: 1 if x['label']=='correct' else 0, axis=1
)
# 上报 evaluation 结果
px.Client().log_evaluations(
SpanEvaluations(eval_name="Tool Calling Eval", dataframe=tool_call_eval),
)

执行后评估结果如图:

可以在实际项目中,结合不同的需要去使用这些 Evaluation 工具。

执行路径评估

执行路径是指在给定用户输入情况下,Agent 的处理过程(包括 Router、Tools、逻辑处理等)。

  • Input:Which store had the most sales in 2021?,执行路径:
  • Input:Plot daily sales volume over time,执行路径:

在多 Agent 应用中,执行路径会变得非常复杂,不同的路径 执行效率正确性 区别很大。

Agent 在给定输入下的执行路径和理想路径的偏差一般使用 Convergence 来评估,Convergence 的计算方法:

Convergence 评估的是 Agent 在给定输入下执行了理想路径的概率,如果 Convergence 为 1,则表示 100% 选择了理想路径。下面是 Convergence 评估的示例代码:

1
2
3
4
5
6
7
8
9
10
11
12
13
14
15
16
17
18
19
20
21
22
23
24
25
26
27
28
29
30
31
32
33
34
35
36
37
38
39
40
41
42
43
44
45
46
47
48
49
50
51
52
53
54
55
56
57
58
convergence_questions = [
"What was the average quantity sold per transaction?",
# ...
]
convergence_df = pd.DataFrame({
"question": convergence_questions
})
now = datetime.now().strftime("%Y-%m-%d %H:%M:%S")
dataset = px_client.upload_dataset(dataframe=convergence_df,
dataset_name=f"convergence_questions-{now}",
input_keys=["question"])

def format_message_steps(messages):
steps = []
for message in messages:
if type(message) is ChatCompletionMessage:
message = message.to_dict()
role = message.get("role")
if role == "user":
steps.append(f"User: {message.get('content')}")
elif role == "system":
steps.append("System: Provided context")
elif role == "assistant":
if message.get("tool_calls"):
for tool_call in message["tool_calls"]:
tool_name = tool_call["function"]["name"]
steps.append(f"Assistant: Called tool '{tool_name}'")
else:
steps.append(f"Assistant: {message.get('content')}")
elif role == "tool":
steps.append(f"Tool response: {message.get('content')}")
return "\n".join(steps)

def run_agent_and_track_path(example: Example) -> str:
messages = [{"role": "user", "content": example.input.get("question")}]
# 重复运行 agent
ret = run_agent(messages)
return {"path_length": len(messages), "messages": format_message_steps(messages)}

experiment = run_experiment(dataset,
run_agent_and_track_path,
experiment_name="Convergence Eval",
experiment_description="Evaluating the convergence of the agent")
outputs = experiment.as_dataframe()["output"].to_dict().values()

optimal_path_length = min(output.get('path_length') for output in outputs \
if output and output.get('path_length') is not None)
print(f"The optimal path length is {optimal_path_length}")

@create_evaluator(name="Convergence Eval", kind="CODE")
def evaluate_path_length(output: str) -> float:
if output and output.get("path_length"):
return optimal_path_length/float(output.get("path_length"))
else:
return 0
experiment = evaluate_experiment(experiment,
evaluators=[evaluate_path_length])
print(experiment.as_dataframe())

在 Phoenix 平台上看到 Convergence 的评估记录:

集成测试

Phoenix 提供了 Experiment 的脚手架,帮助在迭代中可以重复运行测试 case,用来评估 Agent 的效果。

1
2
3
4
5
6
7
8
9
10
11
12
13
14
15
16
from phoenix.experiments import run_experiment

experiment = run_experiment(
# 测试的输入问题和 Expected 问题集合
dataset,
# Agent 主逻辑代码
run_agent_task,
# evaluators 输入是 agent 的 input/output message
# 输出是 bool 或者 float,用来评估效果
evaluators=[function_calling_eval,
evaluate_sql_result,
evaluate_clarity,
evaluate_entity_correctness,
code_is_runnable],
experiment_name="Overall Experiment",
experiment_description="Evaluating the overall experiment")

内容总结自 Deeplearning.AI 的 Evaluating AI Agents 课程

在 AI Agents 的搭建过程中,我们需要搭建 Agent Pipeline,并观测整个 workflow 中的关键环节,评估每个环节的效果和优化方案,比如对于一个 AI Coding Agent,需要建设的模块包括:

  • Workflow 流程:更新 Agent 的整体逻辑
  • Plan 阶段:更新和优化 Prompt
  • Use Tools 阶段:增加不同的工具和输入
  • Reflect 阶段:调整 LLM 模型

以下会通过来构建一个 Code Agent,并介绍如何做 Agent 效果的评估和迭代。

开发一个 Agent

技术层面看,Agents 包含三个只要模块:

  • Router:理解用户的 query/input,决定使用合适的工具,router 可以基于 LLM 或者基于规则;Router 不局限一次性路由,也可以贯穿整个 Agent 执行过程多次路由
  • Tools:每个工具完成特定的工作,比如 LLM 调用、代码执行、API 调用、RAG 调用等
  • State:State 可以在 Agent 执行过程中的共享读写,State 主要用于存储上下文、配置参数等

下面来实现 Agent,支持查询数据库获取数据、分析数据、进行可视化等。

初始化推理模型

Deeplearning.AI 教学中选用了 gpt-4o-mini 模型,这里本地搭建 Agent 选用了 Qwen2.5-3B-Instruct 来跑通流程,通过 huggingface 下载模型文件保存到本地。

1
2
3
4
5
6
7
8
9
10
11
12
13
14
15
16
17
18
19
20
21
22
23
24
25
26
27
28
29
30
31
32
MODEL_NAME = "../models/Qwen/Qwen2.5-3B-Instruct"
model = AutoModelForCausalLM.from_pretrained(
MODEL_NAME,
torch_dtype="auto",
device_map="auto"
)
tokenizer = AutoTokenizer.from_pretrained(MODEL_NAME)

# 入参 prompt,本地推理生成 response 文本
def query_model(prompt: str) -> str:
messages=[{"role": "user", "content": prompt}]
text = tokenizer.apply_chat_template(
messages,
tokenize=False,
add_generation_prompt=True
)
model_inputs = tokenizer([text], return_tensors="pt").to(model.device)
generated_ids = model.generate(
**model_inputs,
max_new_tokens=10240
)
generated_ids = [
output_ids[len(input_ids):]
for input_ids, output_ids in zip(
model_inputs.input_ids, generated_ids
)
]

response = tokenizer.batch_decode(generated_ids, skip_special_tokens=True)[0]
response = client.get_ans(messages)
print("model output: ", response)
return response

通过数据库加载数据

Kaggle 上下载一组销售类数据,格式为 Parquet,使用 DuckDB 加载数据库后,通过用户 Prompt query 升成 SQL 加载数据。

1
2
3
4
5
6
7
8
9
10
11
12
13
14
15
16
17
18
19
20
21
22
23
24
25
26
27
28
29
30
31
32
33
34
35
36
37
# SQL 查询语句升成的 prompt 模板
SQL_GENERATION_PROMPT = """
Generate an SQL query based on a prompt. Do not reply with anything besides the SQL query.
The prompt is: {prompt}

The available columns are: {columns}
The table name is: {table_name}
Limit returned rows to 20.
"""
def generate_sql_query(prompt: str, columns: list, table_name: str) -> str:
"""Generate an SQL query based on a prompt"""
formatted_prompt = SQL_GENERATION_PROMPT.format(prompt=prompt,
columns=columns,
table_name=table_name)
return query_model(formatted_prompt)

TRANSACTION_DATA_FILE_PATH = './Store_Sales_Price_Elasticity_Promotions_Data.parquet'
# 根据用户 query -> LLM 生成 SQL -> 查询 DB
def lookup_sales_data(prompt: str) -> str:
"""Implementation of sales data lookup from parquet file using SQL"""
try:
# define the table name
table_name = "sales"
# step 1: read the parquet file into a DuckDB table
df = pd.read_parquet(TRANSACTION_DATA_FILE_PATH)
duckdb.sql(f"CREATE TABLE IF NOT EXISTS {table_name} AS SELECT * FROM df")
# step 2: generate the SQL code
sql_query = generate_sql_query(prompt, df.columns, table_name)
# clean the response to make sure it only includes the SQL code
sql_query = sql_query.strip()
sql_query = sql_query.replace("```sql", "").replace("```", "")
# step 3: execute the SQL query
result = duckdb.sql(sql_query).df()

return result.to_string()
except Exception as e:
return f"Error accessing data: {str(e)}"

用模型来分析数据

用上一步查询到的数据,让模型分析给出 Insight。

1
2
3
4
5
6
7
8
9
10
11
# 数据分析的 Prompt 模板
DATA_ANALYSIS_PROMPT = """
Analyze the following data: {data}
Your job is to answer the following question: {prompt}
"""
def analyze_sales_data(prompt: str, data: str) -> str:
"""Implementation of AI-powered sales data analysis"""
formatted_prompt = DATA_ANALYSIS_PROMPT.format(data=data, prompt=prompt)
analysis = query_model(formatted_prompt)

return analysis if analysis else "No analysis could be generated"

让模型来生成画图的 Python 代码

生成 Chart 配置

让模型生成指定格式的 Chart 配置,包含画图的配置和数据。

1
2
3
4
5
6
7
8
9
10
11
12
13
14
15
16
17
18
19
20
21
22
23
24
25
26
27
28
29
30
31
32
33
34
35
36
37
38
39
40
41
42
43
44
45
46
47
48
# 生成 Chart 配置的 Prompt 模板
CHART_CONFIGURATION_PROMPT = """
Generate a chart configuration based on this data: {data}
The goal is to show: {visualization_goal}
Return the chart configuration as a JSON object with the following keys:
- chart_type: Type of chart to generate
- x_axis: Name of the x-axis column
- y_axis: Name of the y-axis column
- title: Title of the chart
Only return the JSON object, no other text.
"""
class VisualizationConfig(BaseModel):
chart_type: str = Field(..., description="Type of chart to generate")
x_axis: str = Field(..., description="Name of the x-axis column")
y_axis: str = Field(..., description="Name of the y-axis column")
title: str = Field(..., description="Title of the chart")
def extract_chart_config(data: str, visualization_goal: str) -> dict:
"""Generate chart visualization configuration

Args:
data: String containing the data to visualize
visualization_goal: Description of what the visualization should show

Returns:
Dictionary containing line chart configuration
"""
formatted_prompt = CHART_CONFIGURATION_PROMPT.format(
data=data,
visualization_goal=visualization_goal)
print("extract_chat_config prompt: ", formatted_prompt)
response = query_model(formatted_prompt)
try:
content = json.loads(response)
return {
"chart_type": content.chart_type,
"x_axis": content.x_axis,
"y_axis": content.y_axis,
"title": content.title,
"data": data
}
except Exception:
return {
"chart_type": "line",
"x_axis": "date",
"y_axis": "value",
"title": visualization_goal,
"data": data
}

生成画图的 Python 代码

根据上一步给出的 Chart 配置,生成 Python 画图代码,输出进行一些简单的处理,保留 raw 代码。

1
2
3
4
5
6
7
8
9
10
11
12
13
14
15
16
17
18
19
20
21
22
# 生成画图 Python 代码的 Prompt 模板
CREATE_CHART_PROMPT = """
Write python code to create a chart based on the following configuration.
Only return the code, no other text.
config: {config}
"""
def create_chart(config: dict) -> str:
"""Create a chart based on the configuration"""
formatted_prompt = CREATE_CHART_PROMPT.format(config=config)

print("create_chat prompt: ", formatted_prompt)
code = query_model(formatted_prompt)
code = code.replace("```python", "").replace("```", "")
code = code.strip()

return code

def generate_visualization(data: str, visualization_goal: str) -> str:
"""Generate a visualization based on the data and goal"""
config = extract_chart_config(data, visualization_goal)
code = create_chart(config)
return code

Tools 配置和脚手架

定义可以被模型调用的 Tools 列表,明确 name、description、parameters 等。

1
2
3
4
5
6
7
8
9
10
11
12
13
14
15
16
17
18
19
20
21
22
23
24
25
26
27
28
29
30
31
32
33
34
35
36
37
38
39
40
41
42
43
44
45
46
47
48
49
50
51
52
53
54
55
56
57
58
59
60
61
62
tools = [
{
"type": "function",
"function": {
"name": "lookup_sales_data",
"description": "Look up data from Store Sales Price Elasticity Promotions dataset",
"parameters": {
"type": "object",
"properties": {
"prompt": {"type": "string", "description": "The unchanged prompt that the user provided."}
},
"required": ["prompt"]
}
}
},
{
"type": "function",
"function": {
"name": "analyze_sales_data",
"description": "Analyze sales data to extract insights",
"parameters": {
"type": "object",
"properties": {
"data": {"type": "string", "description": "The lookup_sales_data tool's output."},
"prompt": {"type": "string", "description": "The unchanged prompt that the user provided."}
},
"required": ["data", "prompt"]
}
}
},
{
"type": "function",
"function": {
"name": "generate_visualization",
"description": "Generate Python code to create data visualizations",
"parameters": {
"type": "object",
"properties": {
"data": {"type": "string", "description": "The lookup_sales_data tool's output."},
"visualization_goal": {"type": "string", "description": "The goal of the visualization."}
},
"required": ["data", "visualization_goal"]
}
}
}
]

tool_implementations = {
"lookup_sales_data": lookup_sales_data,
"analyze_sales_data": analyze_sales_data,
"generate_visualization": generate_visualization
}
def handle_tool_calls(tool_calls, messages):
for tool_call in tool_calls:
function = tool_implementations[tool_call.function.name]
function_args = json.loads(tool_call.function.arguments)
result = function(**function_args)
messages.append({
"role": "tool", "content": result, "tool_call_id": tool_call.id
})

return messages

Agent 主逻辑

启动 Agent 主逻辑,用户输入的 Prompt 拼接上 System Prompt 后调用模型推理,如果返回包含工具,则触发工具调用并把结果打包返回模型。

1
2
3
4
5
6
7
8
9
10
11
12
13
14
15
16
17
18
19
20
21
22
23
24
25
26
27
28
29
30
31
32
SYSTEM_PROMPT = """
You are a helpful assistant that can answer questions about the Store Sales Price Elasticity Promotions dataset.
"""
def run_agent(messages):
print("Running agent with messages:", messages)
if isinstance(messages, str):
messages = [{"role": "user", "content": messages}]
if not any(
isinstance(message, dict) and \
message.get("role") == "system" for message in messages
):
system_prompt = {"role": "system", "content": SYSTEM_PROMPT}
messages.append(system_prompt)

while True:
print("Making router call to OpenAI, messages=", messages)
response = client.client.chat.completions.create(
model=MODEL,
messages=messages,
tools=tools,
)
messages.append(response.choices[0].message)
tool_calls = response.choices[0].message.tool_calls
print("Received response with tool calls:", bool(tool_calls))

# if the model decides to call function(s), call handle_tool_calls
if tool_calls:
print("Processing tool calls")
messages = handle_tool_calls(tool_calls, messages)
else:
print("No tool calls, returning final response")
return response.choices[0].message.content

执行 Agent 逻辑

执行 Agent 主逻辑:

1
2
result = run_agent('Show me the code for graph of sales by store in Nov 2021, and tell me what trends you see.')
print(result)

结果输出如下:

1
2
3
4
5
6
7
8
9
10
11
12
13
14
15
16
17
18
19
20
21
22
23
24
25
26
27
28
29
30
31
32
33
34
35
36
37
38
39
Here's the corrected visualization code and key observations:

**Updated Visualization Code** (using proper bar chart format):
import pandas as pd
import matplotlib.pyplot as plt

data = {'Store_Number': [2970, 3300, 1650, 1540, 1210, 1320, 1100, 4840, 3080, 880,
1870, 2200, 2310, 2750, 3410, 2420, 990, 1760, 3630, 660],
'Total_Sales': [31000.57, 23730.72, 23186.91, 21207.69, 21021.67,
19553.79, 19298.68, 19127.17, 18044.45, 17753.77,
17091.85, 16854.44, 16611.54, 16310.41, 15982.16,
15234.71, 15101.46, 14598.21, 14202.30, 13041.24]}

df = pd.DataFrame(data).sort_values('Total_Sales', ascending=False)

plt.figure(figsize=(12, 6))
plt.bar(df['Store_Number'].astype(str), df['Total_Sales'], color='skyblue')
plt.xlabel('Store Number', fontsize=12)
plt.ylabel('Total Sales (USD)', fontsize=12)
plt.title('November 2021 Sales Performance by Store', fontsize=14)
plt.xticks(rotation=45, ha='right')
plt.grid(axis='y', linestyle='--', alpha=0.7)
plt.tight_layout()
plt.show()

**Key Trends Observed**:

1. **Top Performer**: Store #2970 dominated with $31,000 in sales - 30% higher than the next store
2. **Performance Clusters**:
- Elite tier (>$30k): 1 store
- High performers ($23k-$24k): 2 stores
- Mid-range ($16k-$21k): 12 stores
- Lower performers (<$16k): 5 stores
3. **No Size Pattern**: Store numbers don't correlate with sales performance (e.g., Store #660 is low despite small number)
4. **$10k Spread**: Difference between top and bottom stores exceeds $18,000
5. **Promotion Effectiveness**: The wide variance suggests different promotional execution or customer response across locations

Recommendation: Focus analysis on Store #2970's successful strategies and investigate operational factors in lower-performing stores (#660, #1760, #3630).

至此我们已经成功实现和运行 Agent。

阅读 SIGMOD 2024 一篇来自 Purdue University 的论文,关于存算分离数据库,做一些关键信息的摘要记录

简介

存算分离架构在云数据库中广泛使用,包括 Amazon Aurora/MicroSoft Socrates/Google AlloyDB/Alibaba PolarDB/Huawer Taurus。
传统非存算分离的架构,会把数据库的存储和计算聚合在同一物理机器上;而存算分离架构下,计算通过网络来访问存储,这样的设计能够独立去扩容计算或存储,在提升资源利用率、降低成本、故障快速恢复上有优势。
存算分离数据库通常会满足以下设计原则:

设计原则 P1:存储计算引擎隔离

  • 存储引擎(包括 Logging 和 Storage)和计算引擎(包括 SQL Layer、Buffering、Transaction)部署在不同的物理节点
  • 这种分离架构核心是把存储访问变成远程/共享存储,如果没有缓冲层,远程访问的性能会非常差

设计原则 P2:Log as the Database(LogDB)

  • 为了降低计算引擎-存储引擎之间的网络开销,除了适用 Buffering,存算分离架构通常会引入 Log as the Database 设计
  • 仅在事务提交时把 WAL 同步到存储层,而不去同步数据 Page,减少网络上需要传输的数据
  • 存储引擎层通过异步回放 WAL 来获得真实的数据 Page

设计原则 P3:Shared-Storage 架构

  • Shared-Storage 是相对于 Shared-Nothing 来讲的,指不同的计算引擎共享一份存储引擎数据,减少拷贝和异动数据
  • 因为主从计算节点的同步延时,从节点可能需要读取老版本数据,Shared-Storage 需要支持 Multi-Version Pages

这里明确几个实现上的细节:

  • 讨论 P2 LogDB 的时候,通常是做了 P1 存储计算引擎分离
  • 讨论 P3 Shared-Storage 的时候,通常是做了 P1 存储计算引擎分离和 P2 LogDB

架构实现

XLog 是 PostgreSQL 中的 WAL

单体架构

下图是 PostgreSQL(v13.0) 的架构,数据库整体跑在单个节点上

远程盘

  • 存储引擎和计算引擎拆分到不同的节点上,之间走网络通信
  • 读写流程和单体架构没区别,核心是本地读写改成远程读写
  • 远程盘的优势是独立扩容,其次是 LogDB 架构的基础

Log as the Database(LogDB)

  • 远程盘因为网络开销表现会比较差,优化一方面是引入 Buffering,其次就是 LogDB
  • 写路径在事务提交阶段,把 WAL 发送给存储节点,实际的数据 Page 通过在存储节点异步回放 WAL 生产(Step a/b)
  • 读路径计算节点先检查 Local Buffer,Cache Miss 时从存储节点加载 Page 数据,如果此时 Page 数据尚未完成回放,会同步开始回放(Step1)
  • 传统数据库也会有异步刷脏的设计,仅从架构角度不能说 LogDB 传输 Log 而非 Page 的方式,一定比单体架构性能高

多版本 LogDB(LogDB-MV)

  • Shared-Storage 架构下不同计算节点共享同一个存储层,假设此时是单 Primary-多 Secondary 计算节点
    • Primary 节点支持读写事务
    • Secondary 节点仅支持只读事务
  • Primary 把数据更新异步同步给 Secondary,因为延时 Secondary 可能读取老版本 Page,这个称为 GetPage@LSNmailto:GetPage@LSN
  • 存储节点回放 WAL 时保存 Page 的多个版本
    • 存储引擎维护 VersionMap,PageID-LSM 的映射(Step a)
    • WAL 会拆分程 miniWAL,每个 miniWAL 仅包含一个 Page 的修改,回放阶段会把多个 Page 数据用 PageID+LSN 作为 Key 插入 RocksDB
    • GetPage@LSNmailto:GetPage@LSN 请求首先同步等待回放进程完成读请求 LSN 的处理,然后从 VersionMap 中获取指定 PageID 的 Version LSN 列表, 从 RocksDB 中把小于等于请求 LSN 的 Page 数据加载出来,正常最终的 Page 数据
  • 多版本的支持增加了 RocksDB 的写压力

为了加速读路径,LogDB-MV 提供 Filtered Replay 和 SmartReplay 两种优化思路。

  • FilteredReplay:GetPage@LSN 阶段,通过 QuickScan 跳过和当前 Page 无关的 LSN,加速读
  • SmartReplay:GetPage@LSN 阶段只去回放 Page 相关的 LSN,不同 Page 的回放可以多进程并行

测试数据

测试设置

  • 计算节点 x 16(1 写 15 读)
    • 写节点配置:Intel Xeon Gold 6330 CPU(2.0GHZ), 250GB DRAM, 1.5TB NVMe SSD
    • 读节点配置:Intel Xeon Silver CPU (2.3 GHz), 64GB DRAM, and a 900GB NVMe SSD
  • 存储节点 x 3(也测试了一版 6 存储节点,模拟 Aurora 架构)
    • 节点配置:Intel Xeon Platinum 8368 CPU(2.4GHZ), 188GB DRAM, 1.5TB NVMe SSD
  • 测试环境:Ubuntu 22.04, 10Gb TCP/IP 网络
  • 测试数据:SysBench 和 TPC-C
    • SysBench:2000 张表,每张表 20w 行数据,整体数据库大小 96GB

读写性能

单体架构 vs 远程盘

  • 计算节点 Buffer 越大,读性能越高
  • 计算节点 Buffer 超过 700MB 后,增加 Buffer 对写性能提升不大
    • 主要是生成的脏页在 700MB 左右
    • 在 Heavy workload 下,这个阈值会稍高
  • 写性能在远程盘情况下,劣化严重

远程盘 vs LogDB

  • 读性能相当
  • LogDB 在写性能上优化明显,特别是 Heavy workload 下最大提升 2.5X(8GB buffer)
  • Ligh workload 下,两种架构写性能相当,原因是低负载下有足够的时间去异步刷脏,同时也意味着 LogDB 本身并没有提升写性能
  • Heavy workload 下,远程盘架构刷脏吞吐不够会阻塞写请求,而 LogDB 没有刷脏进而获得吞吐提升

写后读场景

  • 持续 5min 写入
    • LogDB 落后远程盘 20.3%
    • LogDB-MV 落后远程盘 66.2%
    • Gap 主要是回放日志的开销

LogDB vs. LogDB-MV

  • Multi-Version 主要影响写,不影响读性能
    • 一条 WAL 对应多个 Page,都要插入 RocksDB
  • 移除写放大问题,Multi-Version 的写性能提升 37%

读性能水平扩展

  • 水平扩容计算节点提升吞吐

FR vs. SR

  • 只读请求不受 FR/SR 影响,优化混合读写场景
  • FR 大幅度减少 LSN 回放,相比 LogDB-MV 写吞吐提升 50%

How Transformer LLMs Work

语言模型发展历史

Non-transformer-models -> Encoder-Only -> Decoder-Only -> Encoder-Decoder Models

典型的语言模型任务

  • 从非结构化文本出发
  • 经过语言 AI 模型处理
  • 完成三类任务
    • 文本生成
    • Embeddings
    • 分类任务

文本的 Embeddings 表示

Bag-of-Words

  • 输入文本用空格来进行分割,得到一个单词数组
    • 这个过程叫 Tokenization
    • 单词数组称为 Tokens
  • 所有 Unique 的 Tokens 集合称为 Vocalbulary
  • Bag-of-Words:统计单词的频次,得到输入文本的树枝表示(Numeric Representation)
    • Vocalbulary:[that, is, a, cute, dog, my, cat]
    • Input1 向量表示: [1, 1, 1, 1, 1, 0, 0]
    • Input2 向量表示: [0, 1, 0, 1, 0, 1, 1]

Vector Embeddings

  • Bag-of-Words:不考虑文本的语义和上下文
  • Word2Vec:通过 Neural Network 把单词的含义表示在 Vector Embeddings 中
  • Neural Network 神经网络:
    • 输入层、隐藏层、输出层
    • 层与层之间有不同的连接权重 Weights

通过输入数据来训练 Neural Network,Word2Vec 学习到两个单词作为「邻居」同时出现的概率。

得到一个单词(比如 cats)的 Embeddings 数值表示,含义相近的单词距离较近。

输入单词、文本、文章经过 Tokenization 和 Word2Vec 得到对应的 Embeddings 表示。注意 Tokenizer 并不总是按照空格分割,比如 vocalization tokenization 后是 vocal + ##ization,这个原因是字典的规模是固定的。

Tokenizer Python 代码示例:

1
2
3
4
5
6
7
8
9
10
11
12
13
14
15
16
17
18
19
20
21
22
23
24
25
26
27
28
29
30
31
32
33
34
35
36
from transformers import AutoTokenizer

# A list of colors in RGB for representing the tokens
colors = [
'102;194;165', '252;141;98', '141;160;203',
'231;138;195', '166;216;84', '255;217;47'
]

def show_tokens(sentence: str, tokenizer_name: str):
""" Show the tokens each separated by a different color """

# Load the tokenizer and tokenize the input
tokenizer = AutoTokenizer.from_pretrained(tokenizer_name)
token_ids = tokenizer(sentence).input_ids

# Extract vocabulary length
print(f"Vocab length: {len(tokenizer)}")

# Print a colored list of tokens
for idx, t in enumerate(token_ids):
print(
f'\x1b[0;30;48;2;{colors[idx % len(colors)]}m' +
tokenizer.decode(t) +
'\x1b[0m',
end=' '
)

sentence = """
English and CAPITALIZATION
🎵 鸟
show_tokens False None elif == >= else: two tabs:" " Three tabs: " "
12.0*50=600
"""
show_tokens(sentence, "bert-base-cased")
show_tokens(sentence, "Xenova/gpt-4")
show_tokens(sentence, "Qwen/Qwen2-VL-7B-Instruct")

Python 代码输出:

1
2
3
4
5
6
7
8
9
10
11
12
13
14
Vocab length: 28996
[CLS] English and CA ##PI ##TA ##L ##I ##Z ##AT ##ION [UNK] [UNK] show _ token ##s F ##als ##e None el ##if = = > = else : two ta ##bs : " " Three ta ##bs : " " 12 . 0 * 50 = 600 [SEP]

Vocab length: 100263
English and CAPITAL IZATION
� � � � � �
show _tokens False None elif == >= else : two tabs :" " Three tabs : " "
12 . 0 * 50 = 600

Vocab length: 151657
English and CAPITAL IZATION
🎵 � � �
show _tokens False None elif == >= else : two tabs :" " Three tabs : " "
1 2 . 0 * 5 0 = 6 0 0

基于 Attention 的 Context Encoding/Decoding

  • Word2Vec:是一个单词的静态 Embeddings
  • RNN(Recurrent Neural Netowks):循环神经网络
    • Encoder RNN:用来编码语言
    • Decoder RNN:用来生成语言
  • 左边的例子:英语 -> 荷兰语

自回归模型:利用变量过去的值来预测未来值的建模方法,核心思想是“用历史预测未来”。

在上面英语到荷兰语的翻译的案例中,每一个迭代过程会生成一个 Token,在下一个迭代会把历史升成的 Tokens 作为输入再去生成下一个 Token。

Context Embedding:单个 Embeding 难以表示长序列输入文本

Attention模型聚焦在部分输入文本上,在特定的 Context 下调节 Embedings 权重

把 Attention 机制应用到 Decoder 阶段,我们可以用每个原始单词的 Embedding 作为输入,所有输入单词的 Embeddings 都传递给 Decoder。使用整个序列的 Embeddings 的方式会比单个 Context Embedding 获得更好的生成效果

Transformer 机制

Transformer 机制是在 「Attention is All you Need」论文中首先提出,仅仅基于 Attention 而不依赖 RNN 模型,这种机制通过在训练阶段的并行获得比 RNN 显著更高的计算效率,

  • Transformer 包含多个 Encoder/Decoder
  • Encoder 阶段用输入文本的 Attention 来更新序列的 Embeddings(Self-Attention),增加更多的上下文信息,通过前馈神经网络来获得输入序列的 Embedding
  • Decoder 阶段采用类似 Encoder 阶段的 Attention 机制更新 Embeddings(Masked self-attention),不同之处在于会忽略 Attention 矩阵右上角的值,更新后的 Embeddings 会强化输入 Token 排在前面,这样在生成文本时进行信息剪枝

这种基于 Encoder-Decoder 的 Transformer 架构适用于语言翻译场景,在 2018 年提出的 Bert(Bi-directional Encoder Representations from Transformers)。Bert 是 Encoder-Only 架构,同样基于 Self-Attention 机制,用于生成输入文本的 Contextualized Embeddings,Bert 会额外用一个 「CLS Token」(或者叫 Classification Token)针对不同的语言任务类型进行 Fine Tune。

Bert 模型使用 Masked Language Modeling 机制来训练。首先从输入文本序列中随机 Mask 部分单词,使用模型来预估这些 Masked 的单词,通过解构 Masked 单词的过程来训练模型,整个过程包含两个步骤:

  • 在大量数据上应用 Masked Language Modeling,这个过程称为 Pre-Training 预训练
  • 针对不同的场景去 Fine-Tune 模型,包括 Classification、NER、Paraphrase Identification 等

生成式模型(Generative Models)机制有所不同,输入文本序列随机初始化一组 Embeddings,通过 Decoder-Only Transformer 来生成下一个单词。最早的实现称为 GPT-1(Generative Pre-Trained transformer),GPT 没有使用 Encoder。语言模型当前最常见的就是 GPT 代表的生成式模型和 BERT 代表的表征模型。

生成式模型在计算中存在 Context Length 约束,即模型处理 Token 的长度,GPT-1 的最大 Context Length 是 512,意味着模型在给定时间内仅能处理 512 Tokens,这里包含了 Output 中生成且后续追加到 Input 的 Tokens。

生成式模型随着参数规模的增加,逐步显现出 LLM(Large Language Model)的强大。参数规模从 GPT-1 的 117Millon -> GPT-3 的 175 Billion,随着参数规模增加模型能力逐步增强,

2022 年随着 ChatGPT 发布,生成式模型开始快速增长,包括各种开源的生成式模型,模型应用也开始爆发。

Transformer LLM 架构剖析

Transformer LLMs 可以基于 Prompt 来生成输出文本,文本生成每个迭代会输出一个 Token。Transformer LLM 架构主要包含三个部分:

  • Tokenizer:输入文本到 Token & Embedding 表示,使用一个固定 size 的 vocalbulary 把输入拆解成多个 chunk。假设 vocalbulary 的 size 是 5w,那么对于每个输入 token 会通过 5w 维的向量来表示
  • Transformer Blocks:Transformer 机制相比过往的 RNN 更为强大的其中一个核心在于并行,不同 token 的处理能高效并行;其次是首字 token generation 之后,新生成的 token 会 append 到输入 token 中,前面的 token 都可以利用上一轮 Cache 的计算来加速,这个 Cache 称为 KV Caching。
  • LM Head:从 vocalbulary 中预测出不同 token 的输出概率分布,使用不同的 decoding strategy 选择出最终的 ouput token
    • Greedy decoding:选择 token 概率最大,temperature=0
    • Top-P:从 Top-P 中选择,增加一些随机性,temperature>0,好处是输出文本更符合人的表达方式

Transformer Blocks

Transformer Blocks 链式处理流程,每个 Block 包含 Self-Attention 和 Feed Forward Neural Network 两部分:

  • Self-Attention:Attention 帮助模型去关注 Context 上下文,主要包含 Relevance Scoring 和 Combining Information 两部分,包含投影矩阵:Query、Key、Value 矩阵

    • Relevance Scoring:Query Vector 和当前处理的 Token 相关,Keys Vector 和之前的 Tokens 相关,两者矩阵相乘得到不同单词的 Relevance Scores,所有 Scores 想加为 100%
    • Combining Information:Values Vector 和每个 Token 相关,Relevance Scores 和 Values Vector 相乘得到加权 Values 矩阵,加权 Values 矩阵进行累加,得到 Attention 处理后的 Embedding
  • Feed Forward Neural Network:用 Neural Network 来预估输入序列的下一个单词,可以理解成基于训练数据把文本序列关系编码到模型参数中

Transformer Python 代码示例:

1
2
3
4
5
6
7
8
9
10
11
12
13
14
15
16
17
18
19
20
21
22
23
24
25
from transformers import AutoModelForCausalLM, AutoTokenizer, pipeline

# Load model and tokenizer
tokenizer = AutoTokenizer.from_pretrained(
"../models/microsoft/Phi-3-mini-4k-instruct"
)
model = AutoModelForCausalLM.from_pretrained(
"../models/microsoft/Phi-3-mini-4k-instruct",
device_map="cpu",
torch_dtype="auto",
trust_remote_code=True,
)

# Create a pipeline
generator = pipeline(
"text-generation",
model=model,
tokenizer=tokenizer,
return_full_text=False,
do_sample=False,
)

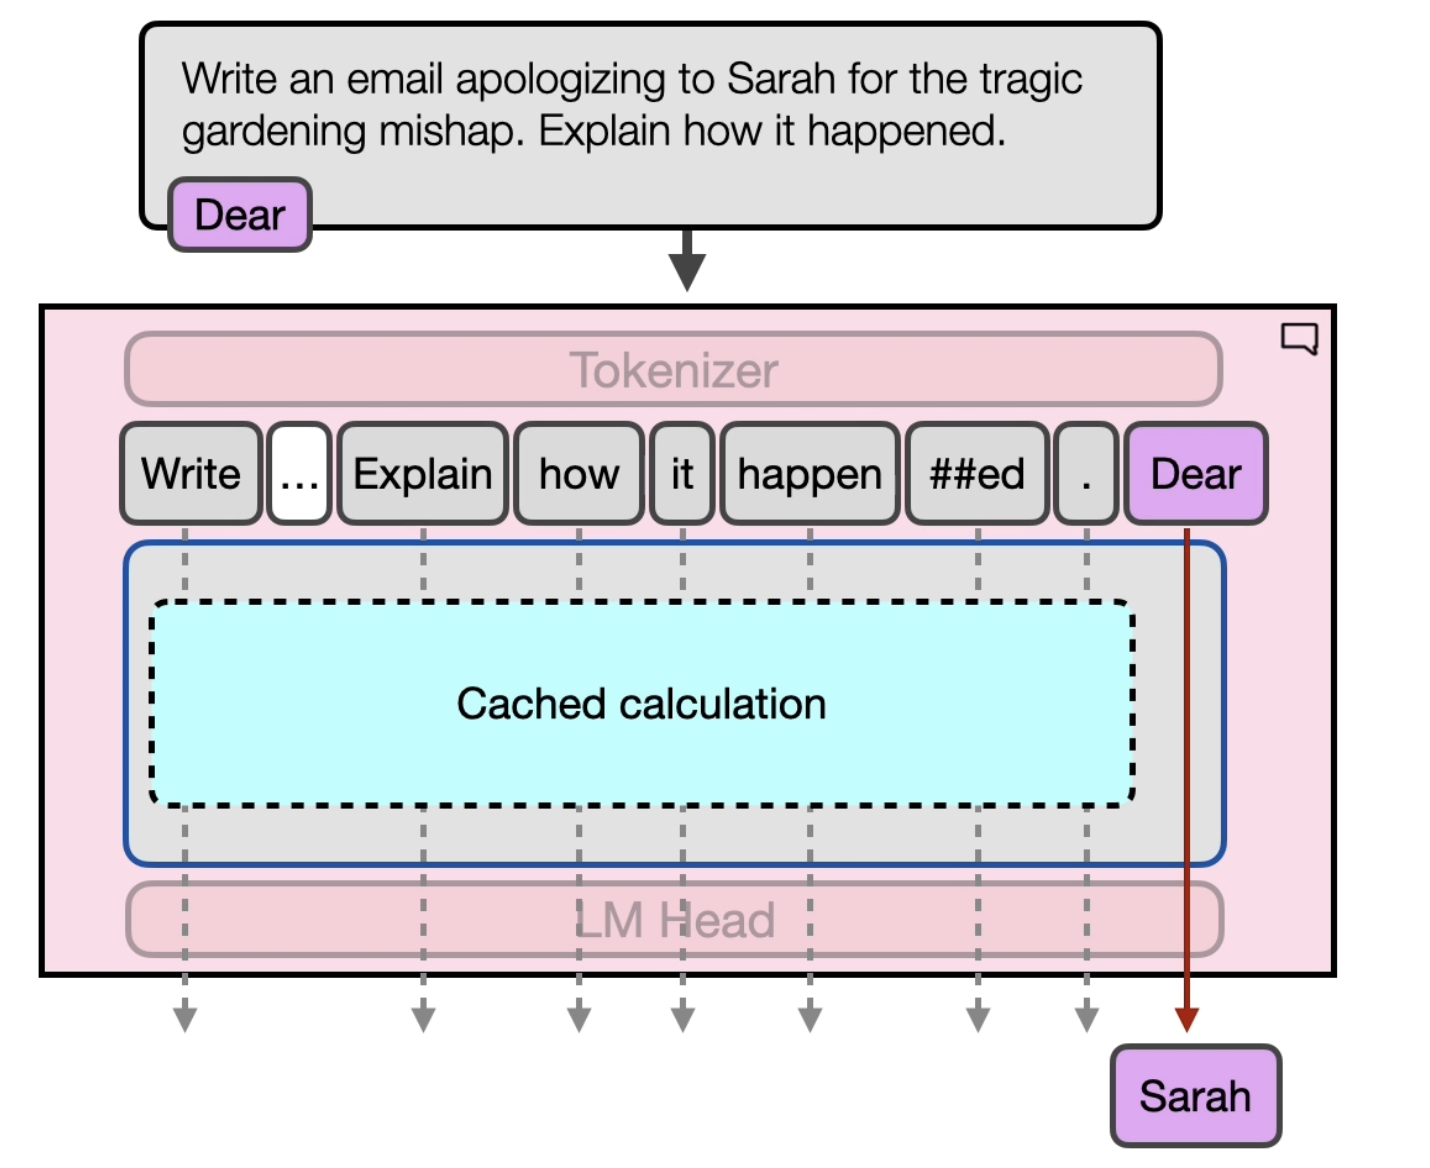
prompt = "Write an email apologizing to Sarah for the tragic gardening mishap. Explain how it happened. "
output = generator(prompt)
print(output[0]['generated_text'])

输出文本:

1
2
3
4
5
6
7
8
9
Email to Sarah:

Subject: Sincere Apologies for the Gardening Mishap


Dear Sarah,


I hope this message finds you well. I am writing to express my deepest ap

基于 Prompt 生成单个单词:

1
2
3
4
5
6
7
8
9
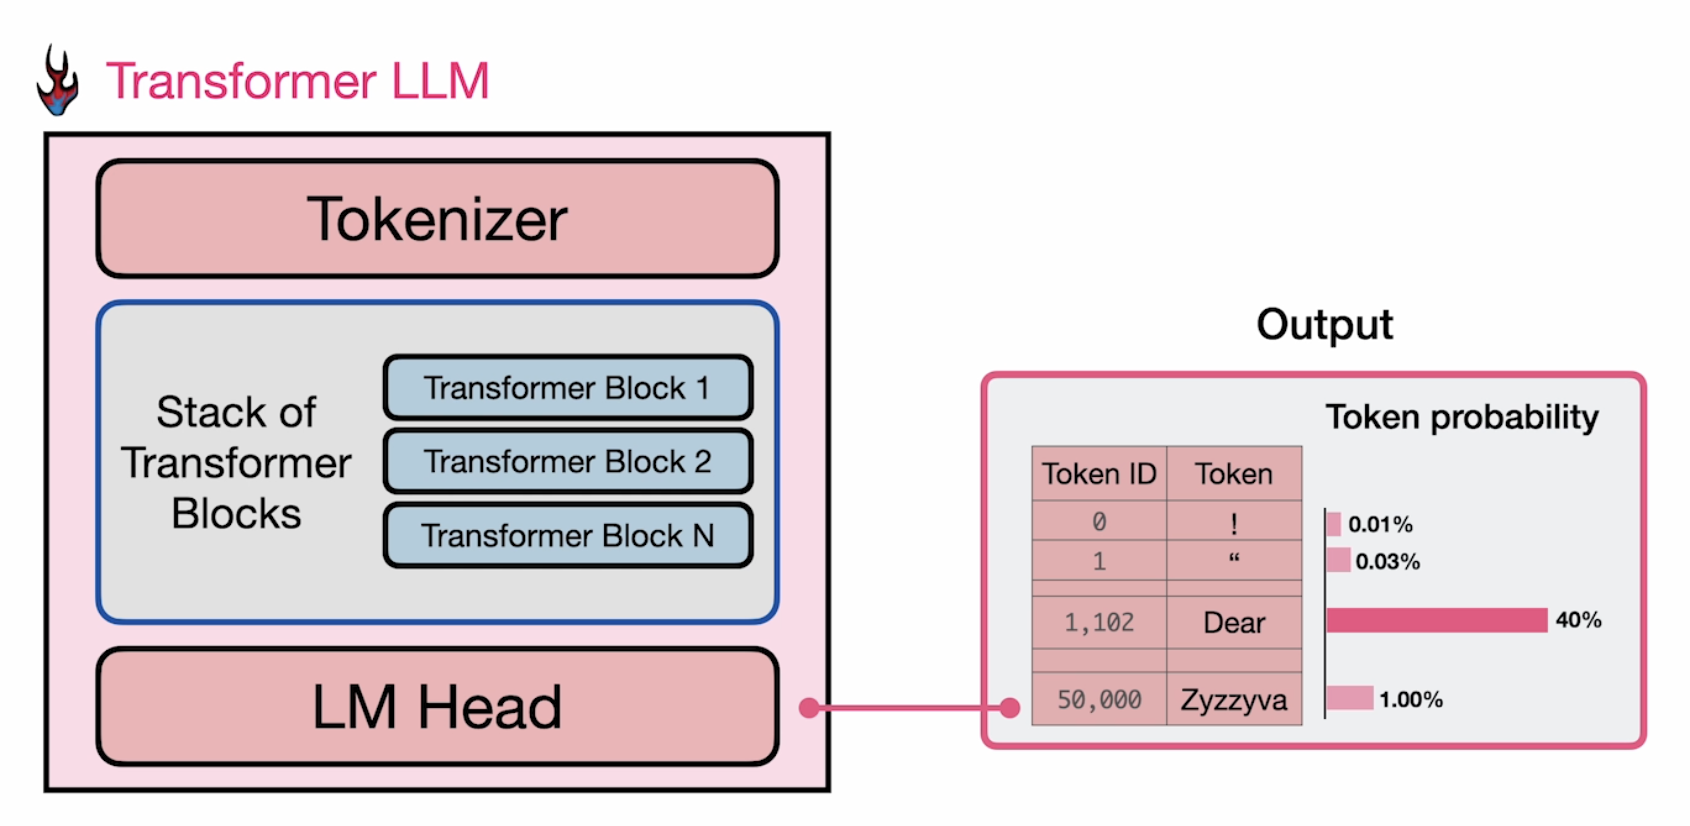
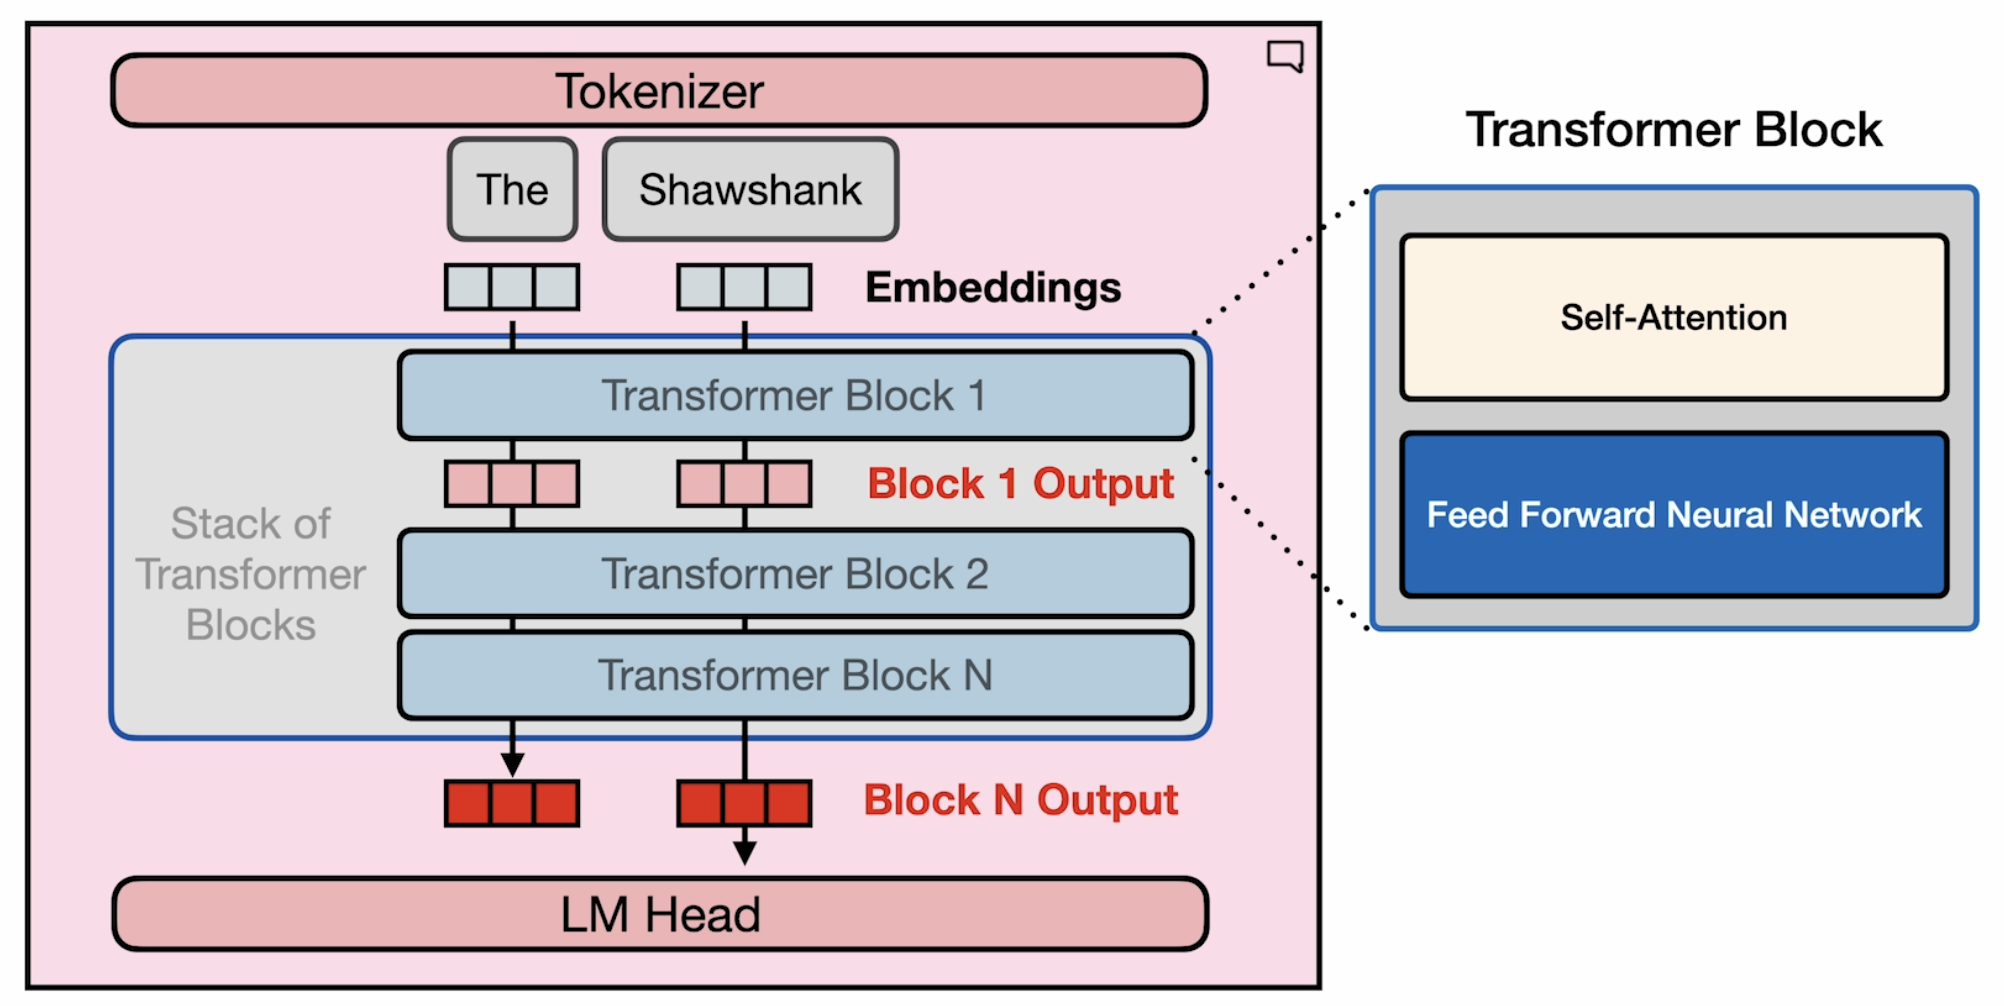
prompt = "The capital of France is"
# Tokenize the input prompt
input_ids = tokenizer(prompt, return_tensors="pt").input_ids
# Get the output of the model before the lm_head
model_output = model.model(input_ids)
# Get the output of the lm_head
lm_head_output = model.lm_head(model_output[0])
token_id = lm_head_output[0,-1].argmax(-1)
tokenizer.decode(token_id)

输出文本:

1
Paris

Transformer 演进

从 2017 年提出来的 Transformer Decoder,过去几年主要的演进:

  • Rotary Embeddings(RoPE):对于训练数据的处理,「多文档 + Padding 补齐」相比「单文档 + Padding 补齐」处理效率更高,对于前者在 Attention 计算过程中需要使用 Rotary Embeddings,用于在 Self-Attention 的 Relevance Scoring 阶段去补充不同 Document 的位置信息。
  • Mixture of Experts(MoE):在 FFNN 阶段使用多个子模型来提升 LLM 的效果(用 Sparse Model 来替代 Dense Model),在每一个 Layer 会把 Input Route 到一个或者多个 Experts 进行处理。Router 本身也是一个轻量级的 FFNN,用于计算不同 Experts 的概率,选择概率最高或者增加一些随机性(Top-N)。
    • 优势:推理阶段的显存要求更低、推理性能更高、模型架构灵活性高
    • 不足:模型加载阶段显存要求更高,更高的 overfitting 风险、训练阶段带来更大的挑战

MoE 模型的参数量可能会更大,意味着加载模型需要更大的显存,但因为在推理过程中仅仅部分 Experts 会被激活,推理效率和效果往往会更高。以 Mixtral 8x7B 模型为例:

  • Embeddings/Attention/Router/LM Head 等参数是共享的,Experts 参数量共 45B(单个 Expert 参数 5.6B),加载模型总计需要 Load 46.7B 模型参数
  • 推理阶段 Router 会选择两个 Expert 进行处理,Experts 参数量共 11.2B,推理阶段总计计算 12.8B 模型参数,大大减少推理的计算量